


 – The Story of the Human Body (Daniel Lieberman)")
 – The Body: A Guide for Occupants (Bill Bryson)")
 – 7 cest, jak díky genům běhat rychleji")
 – Cesta k lepší běžecké výkonnosti")


 – Jóga")
 – Energy and Civilization: A History (Vaclav Smil)")


 – Symphony in C (Robert M. Hazen)")
 – The Story of Earth (Robert M. Hazen)")
 – A Short History of Nearly Everything (Bill Bryson)")


Late last summer at Eurobike, Stages announced a new product line from the company with the addition of their Dash bike computer. But in many ways it’s more than just one product line, but rather an entire collection of products. See Dash is just as integrated into the Stages Link site, where you can create workouts to send to the Dash as well as configure data pages for the Dash. Same goes for tracking your power meter firmware, battery and calibration stats. Not to forget their new mobile apps either.
Of course, as with many in this industry, things took a wee bit longer than expected for the company to get Dash to market, but as of last week it’s now shipping and available. I’ve been using a small flotilla of beta and now final production units since April, across all sorts of conditions in half a dozen countries. I’ve got a pretty good idea of not just where the product sits, but also where it’s going (which may be the more important story here).
As always, once I’ve wrapped things up here, I’ll send back all the Dashes I have to Stages and go out and get my own for future usage/testing. Just the way I roll. If you find this review useful, you can hit up the links at the bottom to help support the site.
With that – let’s dive into it!
Sizing and Weight:
First up, let’s look at size comparisons. I’ve slotted the Stages Dash in alongside a pile of other units in this price range (or popularity range). As you can see, it fits roughly in the middle of them. Of course, this is in the vertical orientation. If you go with horizontal, then it’s a different ball game.

Looking at thickness, it’s actually a tiny bit thinner than most others if you exclude the buttons atop. Or about equal if you include them.

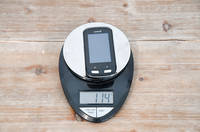
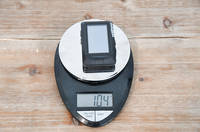
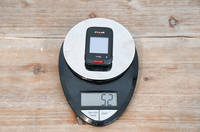
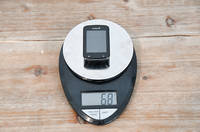
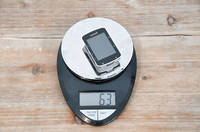
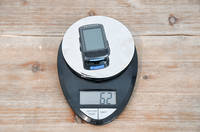
Here’s the Dash weighing in on the scale:

Looking at weights, here’s a quick gallery of the most popular ones out there. The Dash sits as the lightest of the larger display units, below both the ELEMNT and Edge 1000. Thus, you can eat another cookie crumb or two.
One final notable is that I did test the Stages Dash within the Specialized Wind Tunnel back a month or two ago. In general, it didn’t do all that well compared to most other units. You can read about those tests here in this post. The point of the testing was to validate Wahoo’s aerodynamics claims, and the Dash was essentially along for the ride.

Side Note: Missing the unboxing section? Me too. Despite having done like four different unboxings, I left that SD card of photos sitting on my desk and am now traveling. Grr… I’ll add in that section when I return back. I’ll make it extra special, perhaps I’ll add a fancy frame/border around the pictures or something.
The Basics & Configuration:

For this section, I’m going to focus almost 100% on the device itself, with only one brief foray into the website for configuration of data fields. Whereas later in this post I dive into the site in far more detail (as well as the mobile/desktop sync pieces).
On the back, you’ve got a micro-USB charging port, which serves not just for charging but also for syncing of workouts/data when plugged into a PC (there’s also Bluetooth Smart for sync via your smartphone).

You may notice just above that are four little holes. These are the barometric altimeter holes. In the odd event you decide to put tape on the back of your unit (such as for your name/phone number), don’t cover these holes. Like any other bike computer, doing so will give you funky elevation and temperature data. Which in turn will enable your friends to laugh at you when they see your Strava elevation numbers look low and lame.

Next, the unit has five buttons. On the left side, there are two buttons, which act as a back button (lower left), as well as a power/start/stop button (upper left). On the right side, you’ve got menu selector buttons (up/down/confirm).

Meanwhile, on the sides of the unit, you have two grooves, one on the left and one on the bottom. These are for the mounting system:

The unit can be mounted in either landscape or portrait mode. The default is landscape, but you can use it in portrait mode just fine – though the button configs takes a bit of getting used to in the portrait mode. Data screens will re-configure themselves for either mode, but you may want to offer a bit of manual massage assistance there to make sure it doesn’t get all funky when you effectively turn it on its head.

Diving into the menus a bit, when you first power it up, it’ll start to look for GPS immediately. You’ll see small icons displayed along the left menu pane, showing status of sensors, GPS, and Bluetooth Smart. In the below photo the location and power icons are illuminated, though throughout the review you’ll see photos with other icons (heart rate and Bluetooth to name two) also illuminated.

Meanwhile, the right side allows you three core options: Activity (Change activity profile), Zero Reset (for power meter zero offset/calibration), Main Menu (access settings).
Hitting the ‘Activity’ menu button simply changes the activity profile used. You’ll see that listed under the gigantic ‘Ride’ word. Activity profiles store settings such as data fields and even which sensors are accessible (you can assign sensors to multiple activity profiles). This is useful if you have, for example, a triathlon/TT bike and want a different configuration than that on your road bike.
Next, we’ve got the Zero Reset button, which triggers the standard zero offset routine for the power meter you’re currently paired to.

What’s cool about this is that it actually records these values on Stages Link later on, something I’ve been begging other companies to do for years. Having a properly calibrated (or validated, as it may be) unit is one of the most important things to using a power meter. Far too many people don’t ever do this, and thus have questionable results. By also recording the data to the site, you can start to see a history of your zero offsets.
In general, power meters’ zero offset values tend to fall into one of two camps: They stay fairly static, or within a very small range (i.e. PowerTap, Stages, etc…), or they fluctuate a bit more depending on temperature (Quarq, WatTeam, etc…). Neither is wrong, but rather, just different. Knowing those values is useful to determining if there’s potentially something amiss with your unit. Further, for certain power meters (like those from Stages and PowerTap), it’ll also list if your power meters firmware is out of date, as mine apparently is:

Note the above zero offset shows ‘0’ and an error icon. This occurred when I somewhat purposefully spun the crank arm mid-calibration, to see what would happen. Neat to see it properly captured that and showed up on my dashboard as such.
Here’s another from my PowerTap P1 pedals:

(Also note that my total time/distance numbers are funky here due to being on two different accounts during my beta period. My bad.)
With that diversion complete, let’s dive into the ‘Main Menu’ option a bit. It’s here we can configure activity settings, add sensors, edit training pages, and configure global settings and zones.

First up configuring any of your activity profiles settings. You could have different settings for indoor vs outdoor workouts, or one bike vs another. The settings options for these are fairly basic at this time:

Mostly standard stuff you’ve seen in other units like power and cadence zero averaging and backlight configuration. However, one that is worthwhile pointing out is the continuous recording option. When it comes to how to pause recording, you’ve got basically four options: Always-on, Manual Stop/Start, GPS auto-pause, and sensor auto-pause. These are pretty similar to most bike computers, except the sensor auto pause. That enables you to use a combination of sensor and GPS data to have it pause the recording, which ends up being a bit more exact and faster to respond (especially in starts from a stop).

It’s also in the main menu that you can configure global settings across the entire unit:

This includes things like inverting the screen as well:

Heading back up to the main sensors menu, you’ll have the option to see saved sensors, manually enter a new sensor ID, and scan for ANT+ or Bluetooth Sensors. When you first look at your saved sensors you can select any of the sensors to change which activity profiles it may be assigned to (such as all or just a given one). You can’t really do much else at this time beyond that (or deleting it).

Down in the search section, you can search for either ANT+ or Bluetooth Sensors individually:

At this point, the Stages Dash only supports the core sensor types (power/speed/cadence/HR), but not yet things like Di2, FE-C or eTAP (ANT+ Shifting Profile). Though, that is coming soon. Depending on when you read this review, keep an eye out in the full comparison table down below in the review – as that’ll have the latest on where things stand.
Finally, before riding let’s hit up data field configuration. Without question this is one major area that Stages hangs its hat on, given the vast customization and flexibility of what you can do here. In essence, you’ve got up to 16 slots that you can do something with. Of course, you can just as easily have only a few data fields. How you configure them is totally up to you.
You can configure these on the unit itself, or on the site:

But the easiest way to configure them is to use the Stages Link site, which has a data page section, which is first organized by activity profiles:

Above you can see the core activity profile settings (Backlight, Recording Type, Orientation, and Power/Cadence zeros). Then below, you can see the pages assigned to it.

You can add additional pages, or click on a given page to customize it. You can also duplicate an existing page and then edit it, making it easy to tweak minor things. If you click on an existing page you’ll see you can select any given data field and adjust the cell height/width (making it bigger or smaller):

For example, above I’ve selected that field and have it one block high, by two blocks wide. But I could instead make it even bigger, increasing the text size (the little screen on the site doesn’t increase the font size, but in reality on the Dash it’s far bigger):

As you increase/decrease the size, the number of data fields you have available will increase/decrease. You can see that in making this giganto cell, I lost four data fields (now gray on the right-hand side).
Meanwhile, on the right side, you can select the given metric for any cell on that right side. First is the general type (i.e. power, heart rate, etc…), then the sub-type (i.e. normalized power). After that, you’ll select the totaling type (usually max, average, or total), and then the time span (such as 1s, 3s, 10s, etc…). Sometimes the wording here is a bit confusing, but I suspect most will quickly get used to it.

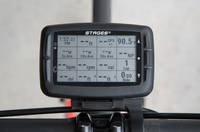
Of course, what this all means is that you can create the mother of all data pages, like this 16-metric page I made. At first glance it may seem overkill, but in actuality it’s quite logical in my little brain.

Ok, you’re right. It’s overkill. But I still contend it’s logical.
Finally, backing up slightly – I’ll mention that there are overall settings for the Dash available online as well. These are located at the top of the same page you’d use to configure the Dash. It’s here I could also rename my Dash to something else beyond the default name.

You’ll notice the firmware is displayed up top, along with a green checkmark that life is happy. You’ll also see the option to sync the next 7 days of workouts (upper right corner). Lower in the settings you’ve got the option to change from statute to metric, as well as how long the unit will wait around before going to sleep, and then whether the screen is inverted or not.
The remainder of the options are around tones/alerts. So each one dictates whether or not a tone is heard or just an overlay on the screen. For example, you can see that for GPS found/lost it’ll give me both a tone and an overlay. Whereas for lap, just an overlay.
With that we’ve covered all of the configuration options to date, let’s head out onto the road for usage while riding.
Riding with it:

To start a ride it’s pretty simple. You just select the gigantic button that says ‘Ride’. Of course, before you do so you’ll want to take note of which sensors are connected and whether or not you have GPS signal.
In general, if I’m in the same spot as my last ride, GPS is really quick (a few seconds). But if I’ve moved a ways (to another city/country/continent), then it takes a fairly long while – a couple minutes. At present they aren’t using any assisted GPS files to speed things up, though it sounds like that’s in the cards.
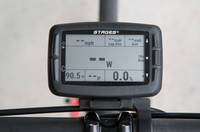
In any case, once you’ve pressed ride, you’ll be brought to your main ride screen:

You can press the up/down buttons to change data screens. Here’s a quick gallery of some of the default screens mixed in with some of my screens.

To start a ride, simply start riding (assuming you leave the defaults on). It’ll notify you that your ride has begun. Else, you can press the upper left button to start riding. It’s that same button that pauses the ride. Also, if you want to zero offset your power meter (at any time), you can hold the middle right button down for three seconds, which will trigger the zero offset menu.
During a ride, you’ll press the lap button to trigger laps. It’s the lower left button. When you do so, it’ll then update any data fields you have that are lap-driven. For example, if you had a lap power average, or a lap timer, those would all reset accordingly. Further, on the lap summary screen, you’ll see the totals for those laps there as well:

Laps are used for more than manual separation though; they’re also used within the structured workouts. One of Dash’s biggest selling points is the workout functionality, which gives coaches and athletes a much tighter integration of structured workouts than pretty much anything else out there.
These workouts can be created online within the Stages Link platform, and can be pretty extensive. Alternatively, you can use any of their various training plans (with an annual membership fee). Here’s an example of one:

These can then be assigned to days on your workout (which happens automatically when choosing a plan), and thus are in turn synced to the Dash. From there you can select them within the menu system. You can also select any workouts you just have stored as well:

Once selected, you can choose to ride the workout – which will automatically show you the current day’s workout:

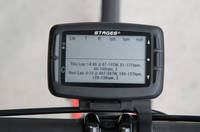
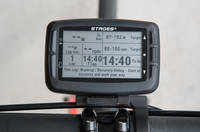
As you start your ride you’ll find the workout target page. This gives you detailed instructions on each segment (or lap as it may be), and what you should be doing:

The main thing here is just how much more space a coach (or yourself) has for instructions compared to the Garmin devices. Also, you’ll notice you can have target ranges, whereas for workouts transferred to the Garmin devices from Training Peaks, those targets are specific to a given power value (i.e. 250w), versus a more useful power range (240-260w).

If you change pages to your lap summary page, you’ll see not only detailed notes for the current lap, but also those for the next lap
All of this works really well, and it walks you through the workout without any complexities (as most other units do as well). Afterwards, you’ll find these stats online within Stages Link:

Finally, to end everything you’ll press that upper left button, which brings up a menu to resume riding, end the ride and save, or end the ride and delete.

And thus, your ride is done.
Synchronizing Data:
As you saw in The Basics section, the Stages Link platform is heavily used for configuration of items on the Dash itself. Thus I want to briefly talk about how the Stages Dash syncs to the Stages Link platform, of which there are two options: Smartphone or desktop.
Stages has a mobile app available for both Android and iOS. At present that mobile app is mostly just a conduit for syncing data to the website from the Dash. There’s not a ton of settings to change from the app itself.
Pairing up the mobile app to the Dash only takes a second, and is done via Bluetooth Smart (random side note: the app supports syncing to multiple Dash units, should you have that or manage a team). Once paired, you’ll see your Dash listed on the main page (there are just two core pages). This first page shows you the overall sync status of the three main pieces: Ride Sync, Workout Sync, and Profile Sync. The Ride Sync deals with completed workouts, the Workout Sync deals with upcoming workouts, and the Profile Sync takes care of device/user settings. You can tap ‘View Sync Details’ to get a bit more…well…details, on the process:


Also, up top, you can rename your Dash if you want. Else, it just uses the last three digits of the serial number on the back of it. Meanwhile, the settings tab takes care of some basic options you have on the Stages Dash, including eat/drink reminders and whether or not the unit receives notifications from your smartphone during a ride. Also, you’ve got the option to delete rides after an upload.


As a general rule of thumb, I never delete rides, because you just never know when you might need them again. There’s a boatload of storage on the unit – thus it’s unlikely I’m going to run out anytime soon.
Switching gears, let’s briefly talk about the Stages Sync for desktop. This app does pretty much the same thing as the mobile version, except with less prettiness:

You’ll go ahead and sign-in to the Stages Sync app, using your account for Stages Link (or actually, any Today’s Plan account). Once you’ve done so, you’ll plug in your Stages Dash, which the app will then associate with your account. So if you have multiple Dash units for multiple users (like a team), it’ll correctly put the data in the right account. It’ll also update firmware accordingly:

While this all sounds great, there’s some annoying gotchyas here, which make this the least favorite part of the entire Stages Dash experience (don’t worry, you don’t actually have to use it). First is that the app requires the installation of the Java runtime stuffs. I’ve gone years without having to install that again, but I had to here. So that’s annoying because that, in turn, requires near constant patching for security reasons.
And second – more annoyingly, is that the Stages Sync app is constantly scanning for certain fitness file types – like .FIT files. So anytime it finds those anywhere on your computer it thinks that folder is a Stages Dash unit. You can then set to ignore that folder, but that in turn leaves a little placeholder file behind in that unsuspecting folder – like rabbit poop. For some users, those won’t matter. But for coaches and others that may have .FIT files from coaches laying around like candy, or being copying them to folders – it’s just an annoyance that anytime I save one the app pops up and makes itself known. I just wish there was a ‘leave me the F alone forever’ option in the app.
Ok, my mini-rant is complete. Really, it’s not that big of a deal, but sometimes little things get me all worked up. Like rabbit poop.
Finally – lacking anywhere else to note this – a brief comment about Stages file formats. By default Stages records in a new format they’ve created called .RDE. That format is available for others to use, but the key strength of it is that it can record more data points per second, ultimately accommodating their ability to do high-speed data capture like they do with their Stages app already. In fact, on the Stages Dash it’ll already capture every pack transmitted by a sensor. So many ANT+ devices transmit up to 4 times per second, and this will capture that data accordingly.

On the Stages Link site you can download more common file formats (like .TCX), and the Stages Sync app will also convert them to .FIT files as well for you.
The Stages Link Platform:
One of the major plays that Stages is making with the Dash is that it’s more than just another bike computer, but rather an entire end to end deep-analysis training platform – something that nobody else really has. Garmin, for example, has the head unit and a platform that shows activities and workouts, but by their own admission they’d redirect you to 3rd parties for deeper analysis of your workouts.
With Stages Link (that’s the name for the web platform), they’ve partnered with Today’s Plan for their web platform. It’s more than just a rebrand (a la the likes of TrainingPeaks and Timex back in the day), as there are areas that Stages wants to take the platform further based on the core from Today’s Plan. For those not familiar with Today’s Plan, they’re one of a number of deep-analysis training platforms that have come along in the last few years – alongside Xert and others, to challenge that of TrainingPeaks.
To begin with an overview, here’s my calendar view. This shows me not only the workouts I’ve completed, but also those that I’ve got scheduled:

Like any platform, I can click on a given workout and see things like graphics with given data points and hover over sections for deeper analysis:


And they’ve got a newer beta section for what they call PI (Performance Index).

More advanced analytics like load progression charts for CTL/ATL/TSB are also available. What’s somewhat notable here is that you won’t see Intensity Factor (IF), Training Stress Score (TSS) and Normalized Power (NP) on Stages Link, since TrainingPeaks won’t license those to them (aka Today’s Plan) for the site. But they are available on Stages Dash itself (which TrainingPeaks will license to). Given these metrics are rather core to quite a bit of the TrainingPeaks’ business, it’s somewhat logical they wouldn’t make them available elsewhere.

I mentioned earlier the plans piece. These training plans are available to either target a specific race/event, or just a general build to awesomeness.

The targeting of an event is pretty cool – because you’re actually selecting the event from the calendar:

You can then choose how many weeks are in the plan as well as the priority (i.e. A/B/C), after selecting an event:

It’ll ask you a pile of questions while generating the plan as well:

This includes asking how many hours you’ve got each day of the week to work with:

All of which ends up creating you a plan that lands on your calendar. Each workout is then available to sync to the dash (it’ll do it automatically) – so that all you need to do is head out for a ride and follow instructions.


There’s also some more mundane but really cool areas, such as the hardware tracking. Along the top there you see the 7-8 different power meters I’ve paired with the Dash and have been using with it over the last while. Normally if one was consistent enough to actually use the same darn power meter every time, you’d get these zero offset and battery drain graphs to be more detailed. In my case I was mixing it up a bit, so you only get two data points – but you can see the coolness behind it (yes, even for non-Stages units).

Another area I appreciate is how easy it is to see a list of all uploaded files. This is handy to be able to quickly skim through and pick out any oddities. While Garmin has this, their site is slow as molasses in this area – so this is awesome.

A few more logistical things; you can sync Stages Link to TrainingPeaks and Strava (for outgoing files), so that when you sync your Dash unit it automatically pushes to those platforms. Inversely, for incoming data you can use the ones on the left. Interestingly in there is Garmin Wellness, which is different than Garmin Connect. Garmin Wellness is the side of the house that allows import of things like step data. Maybe we’ll see them add in Withings too – since that would round out all the major scales (Fitbit, Withings, Garmin, and a side of Under Armour).

So what’s all this set you back?
Well, there are two chunks to Stages Link. One is free, and one is definitely not.
The Free side is anything under the Power Meter and Stages Dash tabs, which allows you access to any configuration portions you want. In addition, you can access the basic summary tab of an activity/workout. Whereas all of the charting and analysis pieces require a monthly or annual membership (there is a trial available). That’s $20 a month, or $200 a year (you do save 2 months of cost with a Dash). All of which is more than Strava or TrainingPeaks. In fact, even more than Today’s Plan itself which is $150.
The Future:

In a lot of ways, the Stages Dash is very much like the Wahoo ELEMNT was one year ago. Both companies announced around the same time in the summer (Eurobike/Interbike), and both companies were delayed until the following late spring for shipping. Both companies have significant experience in the sector, but neither had developed a standalone GPS bike computer before. Wahoo had a bit of a head start due to their RFLKT (non-GPS bike computer) experience, and Stages had more background in the power meter side.
Upon release, both units are/were great options. If you looked at the Wahoo ELEMNT at the time, it had all the core pieces, but it was missing things like Strava Segments or proper routing, as well as a bunch of ‘little things’. The challenge with defining little things is that they matter differently to each person. One person may want cadence zero averaging, while another doesn’t care. Another person may want the ability to specify power meter crank length on the unit itself, while another doesn’t care. And yet another person may want ANT+ FE-C trainer control, whereas again, another doesn’t care.
For both companies though – the trick was how to go up against Garmin which mostly has all these features. Simply being in the market for about a decade meant that Garmin had long since checked off all the 1% items that people want, or at least have come to want (bugs not withstanding). And for the first few months, it was definitely tough for Wahoo. I saw some early adopters that jumped in, but eventually backtracked after stumbles/blocks (only to return again later). But now, a year later with the Wahoo ELEMNT BOLT (which runs identical software to the original ELEMNT) – people are over the moon thrilled. I don’t think I’ve seen a product review with as many happy people as that. But it took a year, and a lot of updating.
And that’s in some ways where I think Stages is. They’ve got a lot of promise, and their initial product is generally pretty solid. There are some quirks, and usability at times can be less simplistic than Garmin (or Wahoo) – but it’s also got a lot of power behind it. Like Wahoo, they’ve got an aggressive slate of upcoming firmware developments. Roughly speaking it’s one major features firmware drop per month (+ whatever bug fixes occur). That’s in the ballpark of what Wahoo was doing as well. For example, here’s the very rough major features schedule for the next few months (the below are exact quotes from them):
July: Ride History (Records, Totals, and Ride breakdowns navigable on the Dash), Advanced workout functionality (Auto Lap advance, Lap Back, out of zone feedback, Compliance score and tools, sub laps), App performance improvements
August: Course integration with Breadcrumb tracking (Across ecosystem), Shifting sensors, SmO2 sensors, Expanded App functionality to include Calendar and basic ride analysis
September: Trainer integration with workouts
But in talking with them, they aren’t 100% stuck on these being the only things. Instead, they’re really looking for user feedback on how to prioritize other new features. Perhaps they’d consider doing some sort of user voting forum or what-not, like some tech companies do, to allow users to help prioritize which features mean the most to them. Again, one individuals most important feature is another’s ‘never used it’ feature, so it’s always a tough balance.
Thus in a lot of ways, I think if you’re happy being an early adopter, the Stages Dash is a solid option. But I think where it’ll really be interesting is next spring (or winter), when they really hit their stride. Just like Wahoo did.
Product Comparison:
I’ve added the Stages Dash into the product comparison tool. This allows you to compare it against any other bike computer (or GPS device) I’ve reviewed. For the purposes of this post, I’ve picked out a few that I think folks will likely compare it against. In some ways though, it’s tricky because naturally you’d compare it against larger units (i.e. Wahoo ELEMNT, Edge 1000, etc…), but of course smaller units (Edge 520/Wahoo Bolt/Polar M460) are just as capable from a tech specs standpoint. No worries, you can mix and match and create your own tables within the product comparison tool here.
| Function/Feature | Stages Dash | Wahoo ELEMNT | Garmin Edge 1000 |
|---|---|---|---|
| Copyright DC Rainmaker – Updated June 16th, 2017 @ 8:09 amNew Window Expand table for more results | |||
| Price | $399 | $329 | $599 |
| Product Announcement Date | Aug 31st, 2016 | Sept 15th, 2015 | Apr 9, 2014 |
| Actual Availability/Shipping Date | Jun 7th, 2017 | March 1st, 2016 | May 2014 |
| Data Transfer | USB & Bluetooth Smart | Bluetooth Smart, WiFi, USB | USB, Bluetooth, WiFi |
| Battery Life (GPS) | 24-30 Hours | 17 Hours | 15 hours |
| Recording Interval | 1-second & All data packets (even faster) | 1-Second | 1-Second or Smart |
| Satellite Pre-Loading via Computer | No | Yes | Yes |
| Quick Satellite Reception | Great if in same location | Yes | Yes |
| Alerts | Audio/Visual | Sound/Visual/LED’s | Sound/Visual |
| Ability to download custom apps to unit/device | No | No | Yes |
Again, remember you can make your own product comparison tool here. Finally, some may ask why the SRM PC8 isn’t in the product comparison tool. Well, generally speaking, I don’t put products in there unless I’ve written a review on it/pending. And while I have used the SRM PC8 here and there, I haven’t written anything more than some hands-on pieces on it. As for writing a review on the PC8? Simply put – nobody has asked for one. At least not in well over a year. Not sure if the price scares people away, or the lack of functionality compared to all the offerings on the market today. Either way, it’s the sound of silence there.
Summary:

Overall I’m pretty impressed with where Stages landed in terms of their first bike computer. They’ve far outdone any other company when it comes to a V1 release, and they’ve put a product in the market that’s definitely worth buying. As I alluded to earlier, I really see the core initial market of the Dash as those who may be considering an SRM head unit. This really targets that market, except at about half the price ($399 vs ~$750). Not to mention a far more integrated platform from head unit to site/mobile app.
Of course, lacking things like Strava integration makes it a much tougher sell for the wider cycling audience. As I’ve said many times before – the mere addition of ‘Strava’ to a title here on the blog dramatically increases interest in the story (despite how rarely I do it). Any time a company has added Strava integration to their unit, folks clamor for it. Similarly, lack of navigation/routing will also be a show-stopper for some.
Yet Stages can overcome some of those limitations by the differentiation it has with dual ANT+/Bluetooth Smart sensor support (no Garmin Edge devices have this), as well as the advanced structured workout support (that Wahoo doesn’t have). Not to mention the 16 data fields on a single page display. Just because you can.
Finally – I’m looking forward to seeing where things end up later this year and into early next year. They’ve built a very solid base and with frequent updates planned – they’ll become even more competitive as time goes on.
Found this review useful? Or just wanna save a bundle? Here’s how:

Hopefully you found this review useful. At the end of the day, I’m an athlete just like you looking for the most detail possible on a new purchase – so my review is written from the standpoint of how I used the device. The reviews generally take a lot of hours to put together, so it’s a fair bit of work (and labor of love). As you probably noticed by looking below, I also take time to answer all the questions posted in the comments – and there’s quite a bit of detail in there as well.
I’ve partnered with Clever Training to offer all DC Rainmaker readers exclusive benefits on all products purchased. By joining the Clever Training VIP Program, you will earn 10% points on this item and 10% off (instantly) on thousands of other fitness products and accessories. Points can be used on your very next purchase at Clever Training for anything site-wide. You can read more about the details here. By joining, you not only support the site (and all the work I do here) – but you also get to enjoy the significant partnership benefits that are just for DC Rainmaker readers. And, since this item is more than $75, you get free 3-day (or less) US shipping as well.
Additionally, while at the moment you can’t use Amazon to purchase the unit, you can still help the site by buying anything else you’d like on Amazon (socks, laundry detergent, cowbells). If you’re outside the US, I’ve got links to all of the major individual country Amazon stores on the sidebar towards the top.
Thanks for reading!
